
Firebase Crashlytics
Firebase Crashlytics is a lightweight, realtime crash reporter that helps you monitor, prioritize, and fix all stability issues that erode your application quality. Crashlytics saves you troubleshooting time by cleverly grouping crashes and highlighting the situations that led up to them.
Product Flavors
Product flavor is a very powerful functionality available in the android gradle plugin that will help us to manage and develop different versions of an application. Creating product flavors is very similar to creating build types: add them to the productFlavors block in your build configuration and also add the extra settings you want. All flavors must belong to a named flavor dimension, which is a group of product flavors. Configuring Crashlytics for multiple build flavor is tricky, compared to configuring crashlytics for android app with no build flavors. That’s why below we have shown a simple example which can help the coders to implement crashlytics for multiple build flavors.
Steps to configure Firebase Crashlytics with different product flavours:
- Create a new project in Android Studio.
- Make changes in build.gradle(Module:app) of your project to add project flavors. Below is the Gradle configuration of our app after adding product flavors.
android {
…
defaultConfig {
applicationId “com.company.project”
…
}
buildTypes {
release{…}
debug{ applicationIdSuffix “.debug” }
}
// Specifies one flavor dimension.
flavorDimensions “version”
productFlavors {
free {
// Assigns this product flavor to the “version” flavor dimension.
// If you are using only one dimension, this property is optional,
// and the plugin automatically assigns all the module’s flavors to
// that dimension.
dimension “version”
applicationIdSuffix “.free”
versionNameSuffix “-free”
}
paid{
dimension “version”
applicationIdSuffix “.paid”
versionNameSuffix “-paid”
}
}
}
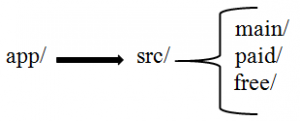
- Switch to project view. Create directories for both flavors (free/paid) at location app/src/ in your project, and in that created directories write features which you want for that particular flavors. Project structure after adding directories will look like this.
- Now you can open build variant (View à Tool Windows à Build Variants) and check there are four options in active build variant (paidDebug, paidRelease, freeDebug, freeRelease).
- In our case, it would be adequate to configure the app to have a different application ID for debug and release build types. You can refer the Gradle configuration mentioned above. Here, the application ID for our example is “com.company.project”, which gets applied to the release build. And the application ID for the debug build becomes “com.company.project.debug” (as we have use applicationIdSuffix “debug” in debug block). If you don’t have to use a suffix, then instead you could specify a whole new value with applicationId.
- Then, in the Firebase Console, you would create a single project, and within that project, create two apps, one for each build type. The debug app would use the application ID “com.company.project.debug”, and the release app would use “com.company.project”.
- After both apps are created, download a google-services.json file from the console and place it into your project app directories. If you look inside google-services.json file, you’ll notice that both apps will appear in there.
“client_info”: {
“mobilesdk_app_id”: “…”,
“android_client_info”: {
“package_name”: “com.company.project.debug”
}
},
“client_info”: {
“mobilesdk_app_id”: “…”,
“android_client_info”: {
“package_name”: “com.company.project”
}
}
The Google Services plugin will figure out which set of configurations to use during the build of each variant.
- Then copy the goggle-services.json and paste it in flavor-specific directory. The Android Gradle plugin follows the following convention for organizing the directories for each flavor.
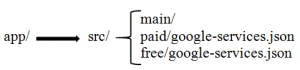
- Notice that each named flavor becomes the name of a directory that sits in src/ adjacent to the main/ directory where your project code typically lives. With this structure, you can drop the google-services.json for each project directly into its dedicated directory. Now, if you want to build the “free” flavor of the app, you can select “freeDebug” from the build variants window in Android Studio, or target the variant’s build task “assemblefreeDebug” on the Gradle command line.
Note: The complexity of writing code for an app will increase with increase in number of build flavors and build types.